Greatist RSS
If the only choice of nut butters you've ever made was between smooth or crunchy, you're missing out. Today, grocery store shelves are stocked with options featuring all sorts of nuts (and seeds!) melded with exotic flavor combos from chili flakes to maple syrup.
 You might also like
 {{displayTitle}} READ
But here’s a little secret that nut butter manufacturers don’t want you to know: In as little as 15 minutes, you can turn a few handfuls of nuts into creamy, smooth, stick-to-the-roof-of-your-mouth goodness in your own kitchenâ€"no industrial machines required. Plus you can customize a nut butter every which way to create flavors that you’ll never discover in a jar of Jif.
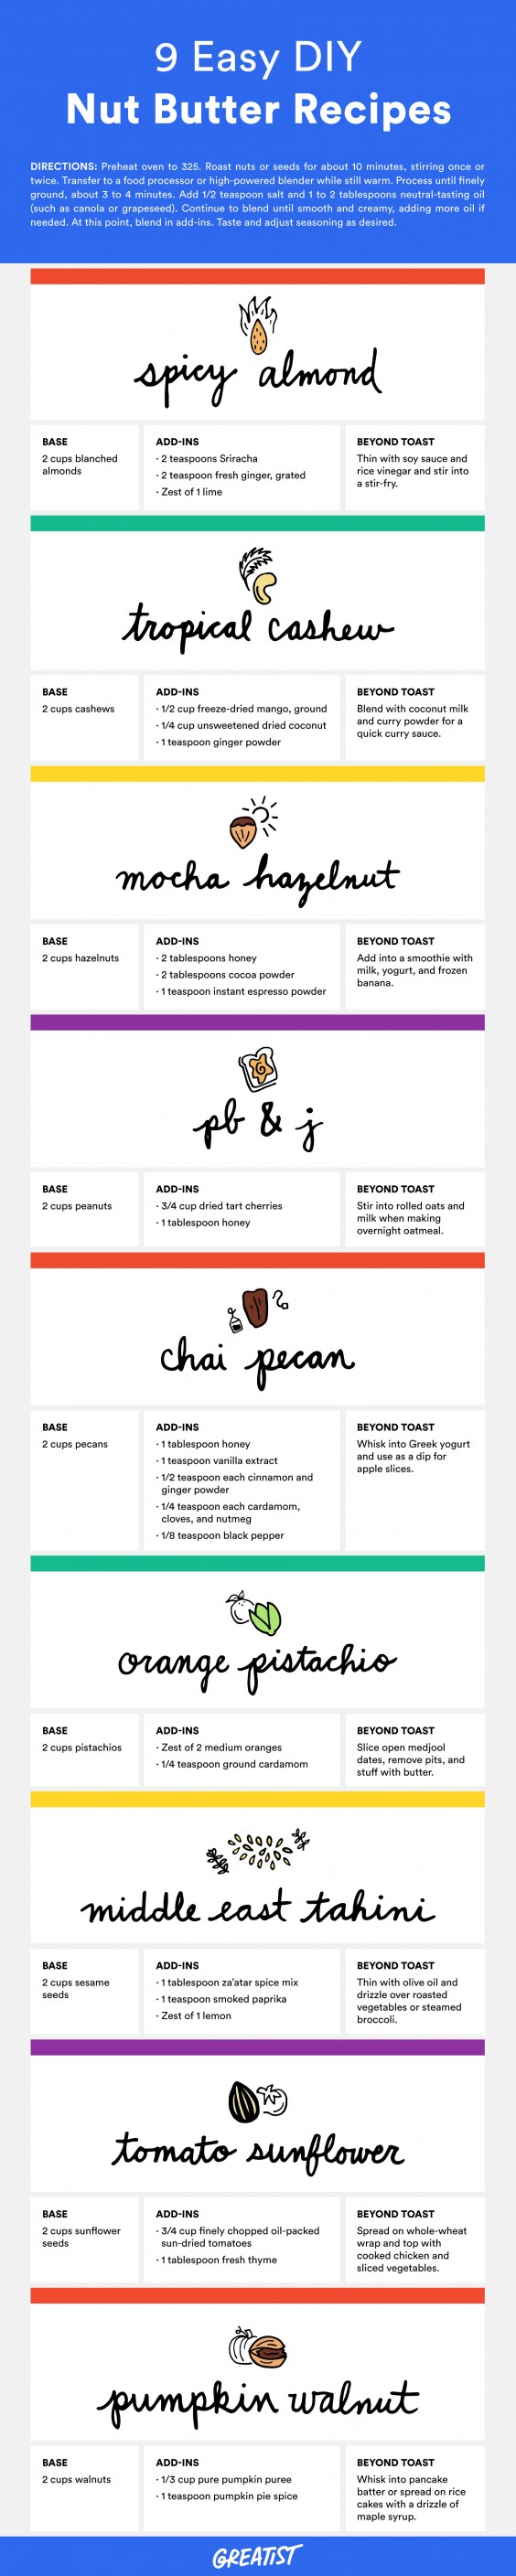
Ready to whip up your own batch? Follow our method and choose from the potential flavor combinations below for ridiculously delicious results every time.

Directions:
1. Preheat oven to 325 degrees. Spread 2 cups raw, unsalted nuts or seeds on a baking sheet. Roast until golden and fragrant, about 10 minutes, stirring once or twice. (Watch closely as nuts and seeds can go from perfectly toasted to bitterly burnt in a flash.)
2. Transfer nuts or seeds to a food processor or high-powered blender while still warm. Process until finely ground and butter begins to form, about 3 to 4 minutes, scraping down the sides as needed.
3. Add 1/2 teaspoon salt and 1 to 2 tablespoons oil. (Use a neutral flavored oil, such as canola or grapeseed.*) Continue to blend until smooth and creamy, scraping down the sides as needed. The time will vary depending on the power of your machine and the types of nuts or seeds used, from 1 to 5 minutes. Add additional oil if needed to create a smooth texture.
4. Blend in any desired flavorings. Taste and adjust seasoning as desired. For a crunchier spread, pulse or stir in some chopped nuts at the end of blending.
*See note below
A Few Notes:
- The spread will last several days at room temperature (the advantage is easier spreading) or in the refrigerator for up to two months.
- Toasting your nuts or seeds before blending will guarantee that the spread is even more tasty. Grinding the nuts while still warm from the oven helps them to release more oils for easier grinding and a creamier mixture.
- *Blending in a touch of oil helps the nuts or seeds break down into a creamier spread. Use neutral-flavored oil, such as canola or grapeseed, or the same oil as the nuts or seeds being turned into butter. (If making almond butter, blend in almond oil.) Coconut oil gives butters great texture but will likely harden the spread if refrigerated, and it may require reprocessing.
- Use a powerful food processor, such as a Cuisinart, or a blender like a Vitamix, since their motors won’t burn out during processing. If using a blender, be sure to follow the manufacturer’s instructions for making nut butters. Halting the machine every minute or so is a good idea, as it gives the motor a chance to cool slightly.
- Skins can infuse butters with a bitter flavor. For almonds, look for blanched almonds that are already skinned. The skins of hazelnuts can be rubbed off with a clean dish towel after roasting.
- If adding a touch of sweetness, go with honey. It emulsifies nut butters better than other liquid sweeteners, like agave or maple syrup.
0 comments:
Post a Comment